ℹ️ Info: If you want to test this project before deploying this yourself, contact me on X. I can't share details of the server because of AI and bots so they dont waste my VPS bandwidth.
Even if you dont trust the server, trusting the client code is the only thing you need thanks to the way this project is designed. My server is protected by Cloudflare and fail2ban. It uses https to not leak metadata, here's how.
⚠️ Warning: You may need to disable IPv6.
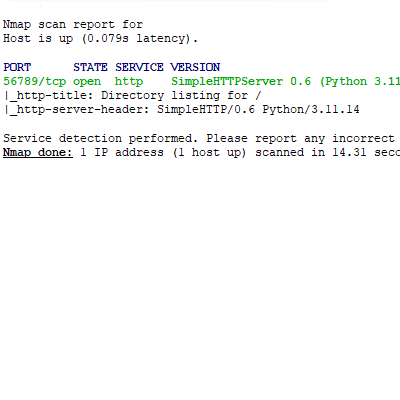
- Server runs as Simple HTTP Server(shown in images below), so no network scan can suggest real intent (Chatting app). Some network analysers may flag this as C2 cause of the E2EE. Only the encrypted server public key is publicly available, so the server doesn't look that blank.
- MITM protection works as following:
- First you get the server public key which is encrypted using Fernet with the server access_code so no third-party could tamper with your future communication. If someone does tamper with data being sent, server will detect it and wont respond.
- After obtaining the server public key, you prove your integrity by decrypting the server public key by access_code entered on the client-side. You than use the public_key to encrypt the authorization process.
- The auth works by you hashing "{access_code}{client_ip}". Then you create time.time() unix timestamp on the second line. All this body is encrypted by server_key. Meaning this process is C2S.
- Server validates the time window, by default 5s, using its own time.time() timestamp. Thanks to chosing unix timestamp, we don't have to consider time zones.
- After the server responds with "AUTH OK", you send the server your client_public_key which is also encrypted using access_code with Fernet. This also ensures MITM protection.
- After sending the public_key, you load room details using /rooms endpoint. Server does not store room details in accessible files, but loads the details and responds with encrypted response which you than decrypt.
- You than select room number. Also C2S. Server responds after checking some details itself, not relying on client-side.
- Now you're waiting in chat room. The server is set by default to hold your request for 60s (long poll). If noone requests to join in to your room, you leave the room and the all logs are cleared. This ensures room rotation. Every request is long polled by default for 60s. If the time exceeds, client data is deleted and client program is terminated.
- If someone does request to join in, they send encrypted request to the server which then decrypts it and executes it if it does meet certain criteria. Execution means sending you an encrypted response to your long poll (meaning real time responses) using your public key.
- You're met with "y/n" asking whether to allow specific ip to join in. Rejecting leaves you in the room. If you do accept, you send your response to the server and are met with another password, this time it is the room password.
- The room password should be known only by those, who are using the same room. Using this password, you encrypt your another key so even the server cant tamper with your messages. You send the key and the server then acts as relay server. The other side tries to decrypt the public key by the specific password. If the pub key was decrypted successfully, that means you've created E2EE even the server cant tamper with.
- Client code is equipped with MITM detection to warn you, if someting was tampered with.
- Every payload is encrypted like this:
- A random, one-time Fernet (AES) key is generated.
- The actual message is encrypted with that key. Fernet has no meaningful length limit.
- The Fernet key itself is encrypted with the recipient's RSA public key.
- Both the key and the message are combined into one payload and sent together
ℹ️ Info: By default, the project is set to http protocol meaning there is metadata leakage possibility. For those super paranoid: You can solve this by using Caddy.
- Code is separated into multiple files for better modularity.
- Leaving the room in process just leaves the logs on the server side RAM. Rejoining was accounted for.
- fail2ban and docker integration is available.
- Once you authorize your ip, anyone can send as many requests as they'd like from your public ip. The server is E2EE so they wont do any real damage, just maybe cause DDOS.
⚠️ Warning: Make sure to rotate server access_code, which is used to C2S. Ensure length of this access_code to be enough to prevent offline brute forcing (Not a big deal for real time MITM, but if you use the same access_code over and over again, it may cause undetectable MITM for future communications). Every room ensures E2EE by creating yet another password which should be known only by those using that room (Stronly recommended changing the password for every room instance). .
 |
 |
ℹ️ Info: Please ignore the IP addresses in the GIF below. It shows the program in a lab testing environment.

- Server is only for UNIX, client is for all platforms.
- Clients are represented by IP addr. Avoid 2 clients from the same IP at the same time.
- If some IP addr. exceeds the ddos_protection var limit, than the program stores the IP addr. into
report.txtpermanently to your dir. Should be used with fail2ban. - Change port var to any port you'd like to avoid bots. If you plan to use Caddy, you'll need to change the Caddyfile port to your own.
- You can also change after how many packets the logs will be erased and
report.txtsaved. (Not for docker) - READ THE FOLLOWING WARNING!
⚠️ Warning: After using/quityour terminal might stop working as intended. If you encounter this type of error, useresetcommand (for Unix)
git clone https://github.com/Jak0ub/Cli_Chatter
cd Cli_Chatter
python3 -m venv venv
source venv/bin/activate
pip install -r req.txt
python3 client.py
report.txt will be now saved to your current dir as report_from_docker.txt. The file WILL be overwritten after restarting the docker.
Switch to root user
sudo su
Prepare working dir
mkdir /opt/chatter
cd /opt/chatter
git clone https://github.com/Jak0ub/Cli_Chatter
touch report_from_docker.txt
chmod 666 report_from_docker.txt
cd Cli_Chatter
docker compose build --no-cache && docker compose up -d
- Do not share server password with everyone. Once someone has your password, they can send as many packets as they'd like.
- Server stores potential threats inside
report.txtorreport_from_docker.txt(docker version) to your current dir. - If you want to ban any IP inside this report, use fail2ban
Fail2ban setup for docker (Ban any IP after specified amount of packets until the server is rebooted)
Install fail2ban(Use your own package manager)
sudo apt install fail2ban
Edit conf file
sudo vi /etc/fail2ban/filter.d/cli_chatter.conf
Paste this inside vi session and use ESC + :wq + Enter
[Definition]
datepattern = ^
failregex = ^<HOST>\s+->\s+\d+x packets$
ignoreregex = ^Logged IP addresses|^If needed|^$
Now edit another config file
sudo vi /etc/fail2ban/jail.d/cli_chatter.local
Paste this inside vi session and use ESC + :wq + Enter
[cli_chatter]
enabled = true
filter  = cli_chatter
logpath = /opt/chatter/report_from_docker.txt
backend = polling
maxretry= 1
findtime= 1
bantime = 86400
action = iptables-multiport[name=CliChatter, chain=DOCKER-USER, port="1:65535", protocol=tcp]
Start the program
sudo systemctl start fail2ban
sudo systemctl enable fail2ban
- First I registered domain at Cloudflare.
- WHY? Because CloudFlare solves the
CF-Connecting-IPheader for me. I can fully rely on the integrity of this header. If someone does tamper with the hearer, Cloudflare drops the request. I do strongly recommend chosing Cloudflare, but do your own research.
- WHY? Because CloudFlare solves the
- Then I bought a VPS.
- I installed the docker, edited the
docker-compose.ymland then I edited theserver.pyfile. DONT JUST COPY PASTE, READ IT THROUGH:
    #I defined this function in the class, because of how Caddy relays the requests
    def address_string(self):
        cf_ip = self.headers.get('CF-Connecting-IP') #CloudFlare ONLY
        if cf_ip:
            return cf_ip.strip()
        forwarded = self.headers.get('X-Forwarded-For') #Backup, dont rely on this
        if forwarded:
            return forwarded.split(',')[0].strip()
        return super().address_string()
    #And I changed these two lines in _GET and _POST:
    client_ip, client_port = self.client_address
    #To this:
    client_ip = self.address_string()
- I then created certificates to ensure https. I went to Cloudflare SSL/TLS > Origin Server and created certificates.
- After transfering the certificates and ensuring correct permissions to
/etc/caddy/cf-origin/ascert.pemandkey.pem, I edited the/etc/caddy/Caddyfileas following:
subdomain.domain.tld {
        tls /etc/caddy/cf-origin/cert.pem /etc/caddy/cf-origin/key.pem
        reverse_proxy localhost:9001
}
- Now i restarted caddy and booted up the docker container.
systemctl restart caddy
systemctl enable caddy
docker compose build --no-cache && docker compose up -d
- Last step was integrating the fail2ban solution, and that's about it!
⚠️ Warning: Clients may need to disable IPv6.